Choosing the suitable power supply unit (PSU) for your PC is a critical decision that can impact your entire computer system’s performance, reliability, and lifespan. A subpar PSU can lead to system instability, unexpected shutdowns, and even hardware damage.
In this comprehensive guide on choosing a PC power supply, we aim to demystify the process of selecting the perfect PSU for your needs. Let’s delve deeper into each section of the guide to provide a more comprehensive understanding.
1. Understanding Power Supply Unit Basics
What is a Power Supply Unit (PSU)?
A Power Supply Unit (PSU) is an essential component in a desktop computer system that converts Alternating Current (AC) from a wall outlet into Direct Current (DC) to power the PC’s internal components. The PSU serves as the electrical backbone of your PC, distributing power to the motherboard, CPU, graphics card, storage devices, and other peripherals. It also regulates the voltage and provides safety features like over-voltage and short-circuit protection.
Key Functions of a PSU:
- Voltage Conversion
- Voltage Regulation
- Power Distribution
- Safety Features
- Cooling
Choosing the suitable PSU is crucial for the longevity and stability of your entire system. A poor-quality or underpowered PSU can lead to system instability, unexpected shutdowns, and, in extreme cases, could even damage your hardware. Therefore, it’s essential to understand your power needs and select a PSU from a reputable brand with appropriate safety features and certifications.
Voltage Rails in a Power Supply Unit (PSU)
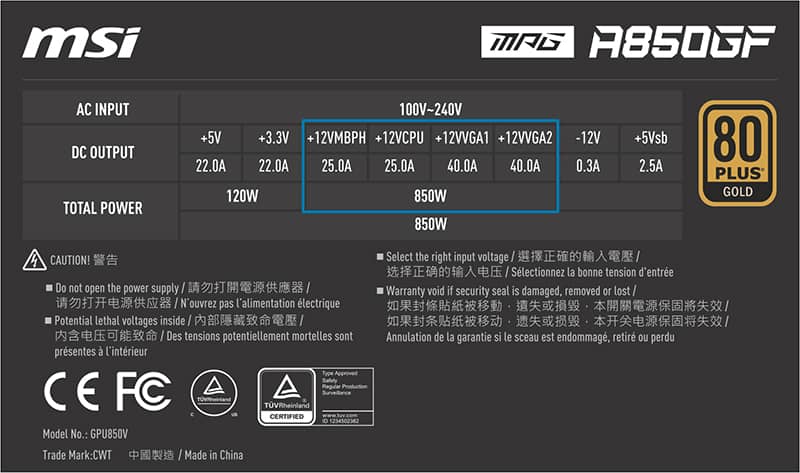
Voltage rails in a PSU refer to the different voltage outputs the unit can provide to power various components inside a computer. These rails are separate circuits within the PSU, each delivering a specific DC voltage. The most common voltage rails in a standard PSU are the 3.3V, 5V, and 12V rails. The 12V rail is the most important as it powers components like the CPU and GPU.
Importance of Each Voltage Rail:
- 3.3V Voltage Rail: This rail is generally used to power some types of RAM and other motherboard components. It was more critical in older computer systems but is less so now, although it’s still present in modern PSUs.
- 5V Voltage Rail: This rail powers older hard drives, optical drives, and motherboard components. Like the 3.3V rail, its importance has diminished in modern systems but is still included in most PSUs.
- 12V Voltage Rail: This is the most crucial rail in modern computer systems. It powers the CPU, GPU, fans, and storage drives. Due to the high power requirements of contemporary CPUs and GPUs, the 12V rail usually delivers most of a PSU’s wattage.
Single Rail vs. Multiple Rails:
- Single 12V Rail: In this configuration, all 12V connectors draw power from a single source within the PSU. This setup is more straightforward and generally easier to manage. Still, if a component fails and causes a short, it could draw too much current and damage the PSU or other components.
- Multiple 12V Rails: The 12V output is divided among two or more rails, each with a separate over-current protection. This is considered safer because if one component fails, it won’t draw excessive current from the entire 12V source, limiting the risk of damage.
Safety Features:
Modern PSUs come with safety mechanisms for each rail, such as over-voltage protection (OVP), under-voltage protection (UVP), and over-current protection (OCP). These features help to safeguard your components by shutting down or regulating the PSU if irregularities are detected.
How To Choose Voltage Rail in PSU
When selecting a PSU, it’s crucial to consider the power requirements of your components and ensure that the unit can deliver adequate power on the necessary voltage rails, especially the 12V rail. Some high-end PSUs will specify the amperage available on each rail, which can be a helpful metric for more advanced users.
Understanding voltage rails is essential for choosing the correct PSU and ensuring a stable and safe power supply for your computer components.
2. PSU Wattage: How Much Do You Need?
Calculating your computer system’s wattage requirements and headroom is crucial in selecting the correct Power Supply Unit (PSU).
To determine the wattage you need, you can use online calculators that input your hardware specifications to give an estimated wattage requirement. Alternatively, you can manually sum up the wattage needs of each component. Here’s how to go about it:
How To Calculate PSU Wattage:
- List Components: List all the components in your system, including the CPU, GPU, RAM, storage devices, fans, and any other peripherals that will draw power.
- Check Manufacturer Specs: Look up the power consumption for each component on the manufacturer’s website or product documentation. These are usually listed in watts (W).
- Sum Up: Add up the wattage requirements for all the components to get a total wattage requirement.
- Example:
- CPU: 95W
- GPU: 250W
- RAM: 10W
- SSD: 5W
- HDD: 10W
- Fans: 15W
- Other peripherals: 15W
- Total: 400W
- Add Overhead for Efficiency: PSUs are most efficient when not running at full capacity. A good rule of thumb is to add a 10-20% overhead for system efficiency.
- Example:
- Total Wattage: 400W
- Overhead (20% of 400W): 80W
- Total with Overhead: 480W
Headroom refers to the extra wattage above your system’s requirements that you should aim for when selecting a PSU. It’s advisable to have a 20-30% buffer to accommodate future upgrades and to ensure that the PSU operates efficiently.
How To Calculate Wattage Headroom in PSU
Calculate Headroom: Aim for a PSU that offers 20-30% more wattage than your calculated needs, including the overhead.
Example:
- Total with Overhead: 480W
- Headroom (30% of 480W): 144W
- Total with Headroom: 624W
Round-Up: It’s good to round up to the nearest commonly available PSU wattage. You might round up to a 650W or 700W Power Supply Unit (PSU) in this example.
Calculating the PSU wattage and headroom ensures that your power supply can handle your current components and any future upgrades while operating efficiently. Remember that skimping on your PSU can lead to system instability and even hardware failure, so investing in a quality unit that meets your needs is worth investing in.
3. Power Supply Efficiency and 80 PLUS Ratings
What is Power Supply Efficiency?
Power Supply Efficiency refers to the ratio of the useful power output to the total electrical power input. In simpler terms, it measures how effectively a Power Supply Unit (PSU) converts the Alternating Current (AC) from your wall outlet into the Direct Current (DC) used by your computer’s components. The higher the efficiency, the less power is wasted in the form of heat, saving you money on your electricity bill and resulting in a cooler and potentially quieter system.
How is Efficiency Measured?
Efficiency is usually expressed as a percentage. For example, suppose a PSU is 90% efficient. In that case, 90% of the electrical power drawn from the wall is converted into useful DC power. At the same time, the remaining 10% is lost as heat.
Efficiency=(Useful DC Output/Total AC Input)×100
What is 80 PLUS Certification?

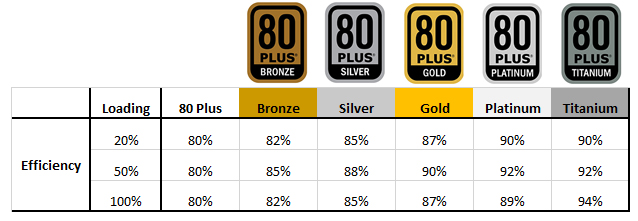
The 80 PLUS Certification program is a widely recognized standard for measuring PSU efficiency. A PSU that is 80 PLUS certified is guaranteed to be at least 80% efficient at 20%, 50%, and 100% of its maximum load.
However, the 80 PLUS certification program has several tiers to indicate different efficiency levels, commonly known as Bronze, Silver, Gold, Platinum, and Titanium ratings.
- 80 PLUS (White): 80% efficiency
- 80 PLUS Bronze: Around 85% efficiency
- 80 PLUS Silver: Around 88% efficiency
- 80 PLUS Gold: Around 90% efficiency
- 80 PLUS Platinum: Around 92% efficiency
- 80 PLUS Titanium: Around 94% efficiency
80 PLUS Bronze
- Efficiency: Approximately 85% efficient at 50% load.
- Usage: Suitable for budget to mid-range systems.
- Cost: Generally more affordable than higher-rated PSUs.
80 PLUS Silver
- Efficiency: Approximately 88% efficient at 50% load.
- Usage: Suitable for mid-range to high-end systems.
- Cost: Moderately priced, offering a balance between cost and efficiency.
80 PLUS Gold
- Efficiency: Approximately 90% efficient at 50% load.
- Usage: Ideal for high-end systems and workstations.
- Cost: Higher cost but offers significant energy savings over time.
- Heat: Produces less heat than Bronze and Silver, potentially reducing cooling costs.
80 PLUS Platinum
- Efficiency: Approximately 92% efficient at 50% load.
- Usage: Suitable for high-performance and enterprise-level systems.
- Cost: Expensive but offers long-term energy savings.
- Heat: Even less heat production, further reducing cooling needs.
80 PLUS Titanium
- Efficiency: Approximately 94% efficient at 50% load.
- Usage: Best for mission-critical systems where maximum efficiency and reliability are required.
- Cost: Most expensive but offers the highest energy savings.
- Heat: Minimal heat production can be crucial in high-performance computing environments.
Why is Efficiency Important?
- Cost Savings: A more efficient PSU will consume less electricity for the same amount of work, reducing energy bills.
- Environmental Impact: Higher efficiency means less electricity is wasted, which is better for the environment.
- System Cooling: Less wasted energy means less heat, resulting in a cooler and potentially quieter system.
- Component Lifespan: Excessive heat can shorten the lifespan of electronic components. An efficient PSU can help mitigate this risk.
Understanding power supply efficiency is crucial when choosing a PSU for your system. A high-efficiency PSU will save you money in the long run and contribute to a more stable, cooler, and environmentally friendly computing experience. Therefore, it’s often worth investing in a PSU with a higher efficiency rating, especially for systems running for extended periods.
4. PSU Form Factor and Size
The form factor and size of a Power Supply Unit (PSU) are critical considerations when building or upgrading a computer. These factors determine whether the PSU will fit into your case and how it will interface with your motherboard and other components. Below are the key aspects you need to know about PSU form factors and sizes.
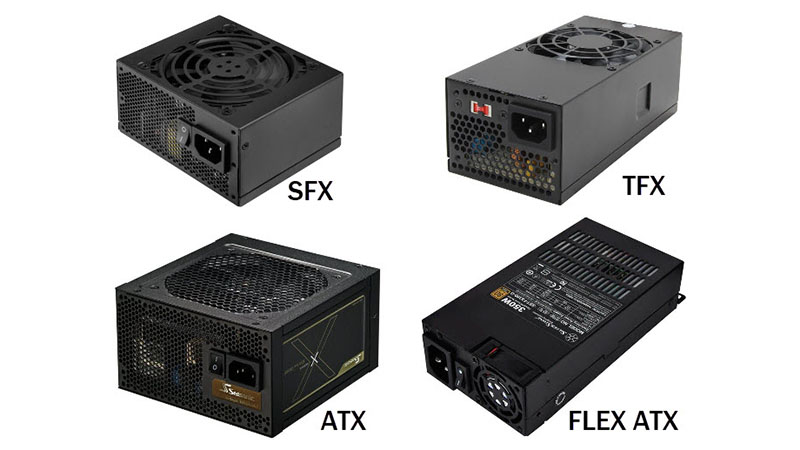
Common Form Factors:
- ATX: This is the most common form factor and is compatible with most mid-tower and full-tower cases. Standard dimensions are generally 150mm (W) x 86mm (H) x 140mm (D), although the depth can vary.
- SFX: Small Form Factor (SFX) PSUs are designed for mini-ITX and compact cases. They are generally smaller in all dimensions than ATX PSUs but can still offer high wattages.
- EPS: Extended Power Supply (EPS) is similar to ATX but is often used in servers and workstations that require more power connectors.
- TFX: Thin Form Factor (TFX) is designed for slimline desktop cases and is longer and narrower than ATX PSUs.
- Flex ATX: Even smaller than TFX, Flex ATX is used in ultra-compact cases and often has lower wattage capabilities.
Size Considerations:
- Dimensions: Always check the dimensions of the PSU and compare them with the available space in your case. Some high-wattage or high-efficiency models may be longer than standard sizes.
- Cable Length: Ensure the cables are long enough to reach your components, especially in larger cases or unique layouts.
- Fan Size: Larger fans generally offer better cooling and quieter operation but may increase the overall size of the PSU.
Compatibility:
- Motherboard: Ensure the PSU has the correct connectors for your motherboard, typically a 24-pin ATX and an 8-pin or 4+4-pin EPS for the CPU.
- Graphics Card: High-end GPUs often require one or more 6-pin or 8-pin PCIe connectors.
- Peripherals: Ensure enough SATA and Molex connectors for your storage devices and other peripherals.
Future-Proofing:
- Wattage: If you plan to upgrade your system in the future, consider a PSU with higher wattage than you currently need.
- Modularity: A modular or semi-modular PSU allows you to remove unused cables, making it easier to accommodate new components later.
Choosing the correct form factor and size for your PSU is crucial for a successful PC build or upgrade. Always double-check compatibility and dimensions to ensure a seamless installation process and optimal system performance.
5. Power Supply Connectors and Cables
When building or upgrading a computer, understanding the types of connectors and cables that come with your Power Supply Unit (PSU) is crucial. Different components in your system require different types of power connectors, and ensuring compatibility is key to a successful build. Here’s a detailed look at the various connectors and cables you might encounter.
1. P1 24-pin (PC Main / ATX Connector)
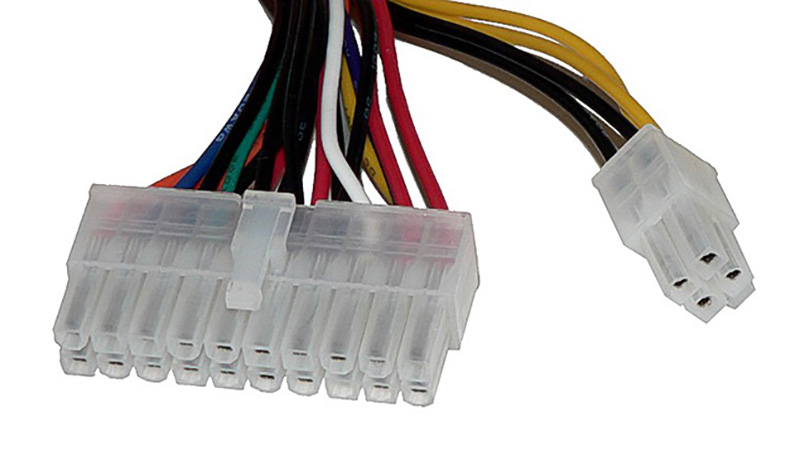
The P1 24-pin ATX connector is the main power connector that plugs into the motherboard. Some older motherboards may use a 20-pin ATX connector, but most modern boards use the 24-pin variant.
- Purpose: This main power connector supplies power to the motherboard.
- Compatibility: Most modern motherboards use a 24-pin ATX connector. Some older motherboards may use a 20-pin connector.
- Voltage: Typically provides +3.3V, +5V, and +12V.
2. P4 8-pin EPS Connector
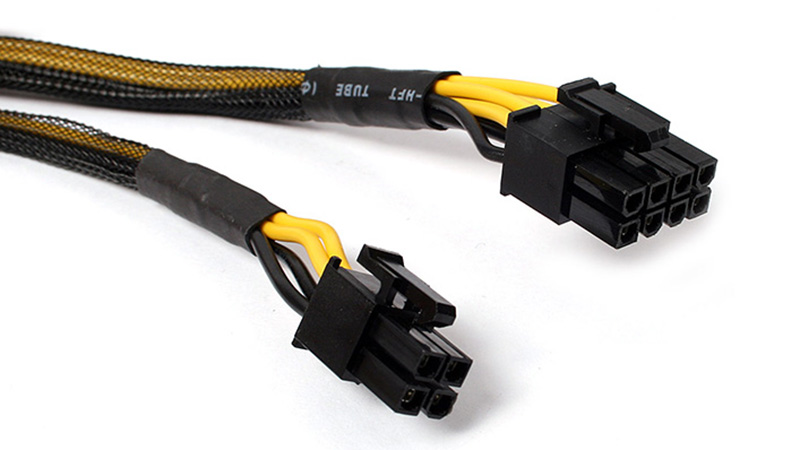
The 8-pin P4 EPS (Extended Power Supply) connector is an essential part of modern computer power supply units (PSUs) and plays a crucial role in supplying power directly to the CPU.
Typically supplying +12V, it plugs into an 8-pin socket on the motherboard near the CPU. Some high-performance systems may even require two of these connectors. The connector often comes in a 4+4 pin design, allowing it to be split for motherboards that only need a 4-pin connection.
- Purpose: Provides power directly to the CPU.
- Compatibility: Plugs into an 8-pin socket on the motherboard near the CPU. Some motherboards may require two of these for high-end CPUs.
- Voltage: Typically provides +12V.
3. PCIe Connector (6-pin en 6+2 pin)
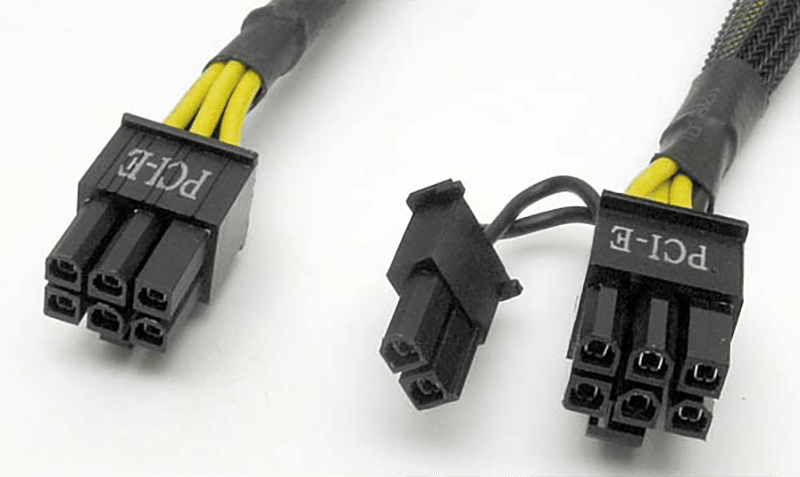
The PCI-E (Peripheral Component Interconnect Express) connectors, specifically the 6-pin and 6+2-pin variants, are designed to provide additional power to graphics cards. These connectors are crucial for powering GPUs that require more energy than can be supplied through the motherboard’s PCI-E slot alone.
6-Pin PCI-E Connector
- Purpose: The 6-pin PCI-E connector is used to supply additional power to mid-range graphics cards.
- Voltage: It typically provides +12V power.
- Compatibility: Most modern mid-range GPUs require at least one 6-pin connector, although some may need two.
6+2 Pin PCI-E Connector
- Purpose: The 6+2 pin PCI-E connector is a more versatile version of the 6-pin connector and is designed for high-end graphics cards that demand more power.
- Voltage: Like the 6-pin connector, it also provides +12V power.
- Compatibility: High-end and some overclocked GPUs may require one or two 6+2 pin connectors.
- Flexibility: The extra 2 pins make it compatible with 8-pin sockets, allowing it to be used as either a 6-pin or an 8-pin connector, depending on the GPU’s requirements.
Both connectors are essential for gamers, video editors, and anyone relying on powerful graphics cards. They ensure the GPU receives the necessary power to operate effectively, especially under heavy loads. Always check your graphics card’s power requirements and ensure your PSU has the necessary 6-pin or 6+2-pin connectors to match.
4. 4-pin Molex Connector
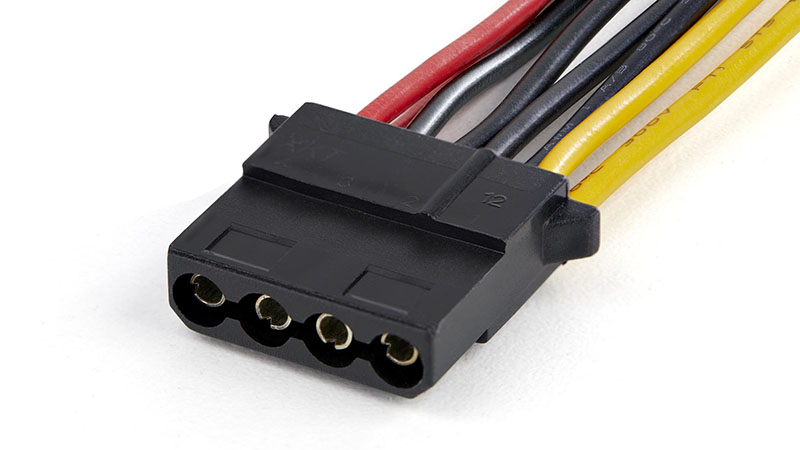
The 4-pin Molex connector is one of the older power connectors commonly used in computer systems before the widespread adoption of SATA. While it has been largely replaced by the SATA power connector for storage devices, the 4-pin Molex is still found in some modern computer systems for other purposes.
- Purpose: Originally, the 4-pin Molex was used to power hard drives, optical drives, and even some early graphics cards. Today, it’s often used for case fans, older drives, and specialized devices.
- Voltage: The Molex connector provides two voltage levels: +5V and +12V. This makes it versatile for powering a variety of older hardware.
- Design: The connector is generally larger than a SATA power connector and has a more rectangular shape. It contains four pins enclosed by a plastic casing, which is often white.
- Compatibility: While it’s less commonly used today, the 4-pin Molex is still found on many PSUs for compatibility with older hardware or specialized components.
5. SATA Power Connector
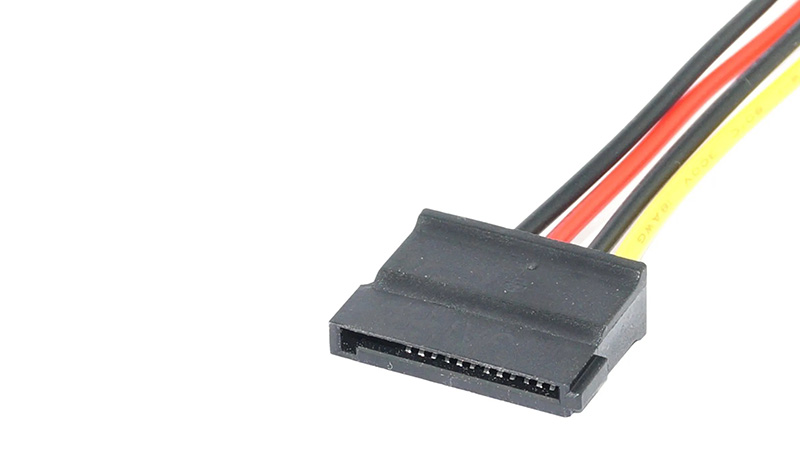
The SATA (Serial ATA) power connector is a standard power connector used to supply electricity to SATA devices such as hard disk drives (HDDs), solid-state drives (SSDs), and optical drives like DVD and Blu-ray players. This connector has largely replaced most storage devices’ older 4-pin Molex connectors.
- Purpose: The primary role of the SATA power connector is to provide power to internal storage devices and some other peripherals.
- Voltage: It delivers multiple voltages, typically +3.3V, +5V, and +12V, to accommodate the different power needs of various devices.
- Design: The connector usually has a flat, elongated shape with 15 pins, making it easily distinguishable from other connectors. It’s also keyed to prevent incorrect insertion.
- Compatibility: The SATA power connector is universally compatible with all devices with a SATA power port, making it the go-to choice for modern internal storage solutions.
6. 4-pin Fan Connector
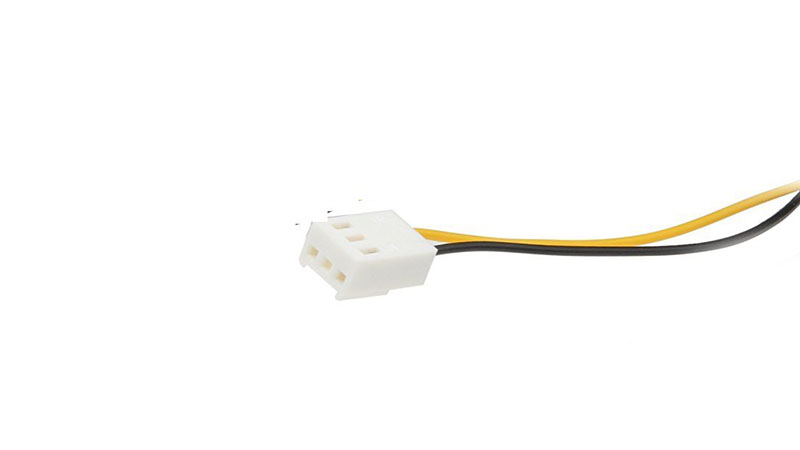
The 4-pin fan connector is a standard interface for connecting case fans, CPU coolers, and other cooling solutions directly to the motherboard or sometimes to the power supply unit (PSU). This connector is crucial in maintaining optimal temperatures within your computer system.
- Purpose: The primary function of the 4-pin fan connector is to provide power to the fan while also allowing for speed control and monitoring.
- Voltage: Typically, it operates on a +12V power supply, which is standard for most fans.
- Design: The connector usually consists of four wires: ground, +12V power, speed control (PWM), and speed sensing. The 4-pin design allows for Pulse Width Modulation (PWM) control, enabling variable fan speeds based on system temperature.
- Compatibility: 4-pin fan connectors are designed for PWM control but are backward compatible with older 3-pin fans. However, you’ll lose the PWM functionality in such cases.
7. Mini-Molex / Floppy Drive Connector
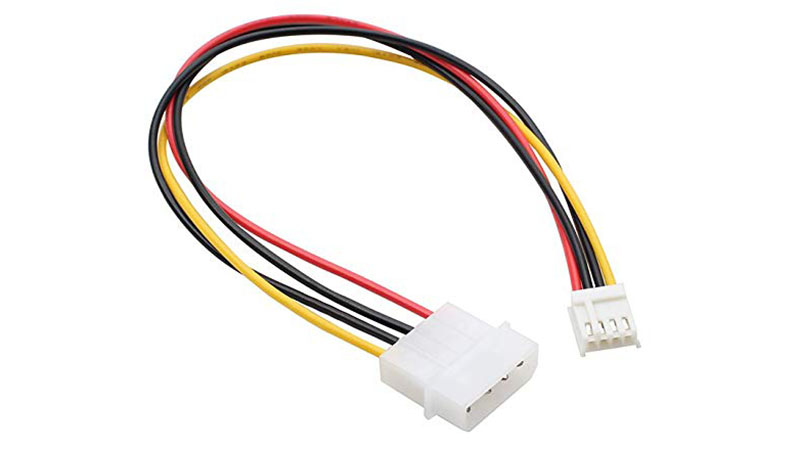
The Mini-Molex, or the Floppy Drive Connector, is a smaller version of the standard 4-pin Molex connector. It was primarily used to provide power to floppy disk drives, which are now largely obsolete in modern computer systems. However, you may still encounter this connector type in older computers or specialized applications.
- Purpose: The primary function of the Mini-Molex connector was to power 3.5-inch floppy drives. It may occasionally be used for other specialized hardware or legacy devices.
- Voltage: Like the standard Molex, the Mini-Molex provides two voltage levels: +5V and +12V. This makes it suitable for a range of older or specialized hardware.
- Design: The connector is smaller than a standard Molex and usually has a yellow, black, and red wire. It contains four pins but is often found with just two wires, as not all pins are always used.
- Compatibility: While it’s rare to find new hardware that requires a Mini-Molex connector, some PSUs still include one for backward compatibility.
8. 4-pin Berg Connector
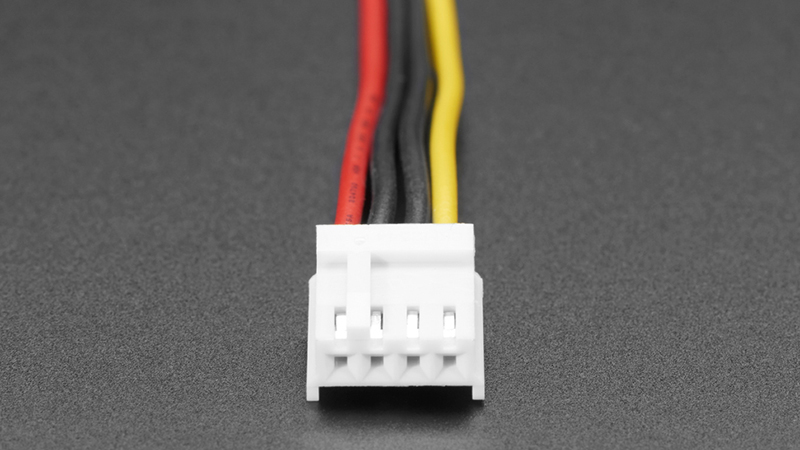
The Berg connector is a 4-pin power connector commonly used to provide electrical power to floppy disk drives in older computer systems. While it has largely been phased out in favor of more modern connectors, you may still encounter it in legacy systems or specialized applications.
- Purpose: The Berg connector’s primary role was to power 3.5-inch and 5.25-inch floppy disk drives. Sometimes, it may also be used for other legacy hardware components.
- Voltage: The Berg connector typically provides +5V and +12V, similar to the standard Molex and Mini-Molex connectors. This makes it versatile for powering a variety of older hardware.
- Design: The connector is small and usually square-shaped, with four pins arranged in a row. It’s often keyed to prevent incorrect insertion, ensuring that it can only be plugged in one way.
- Compatibility: Given its obsolescence, it’s rare to find Berg connectors in modern PSUs. However, some power supplies designed for backward compatibility may still include one.
9. C-Link or I2C Connector
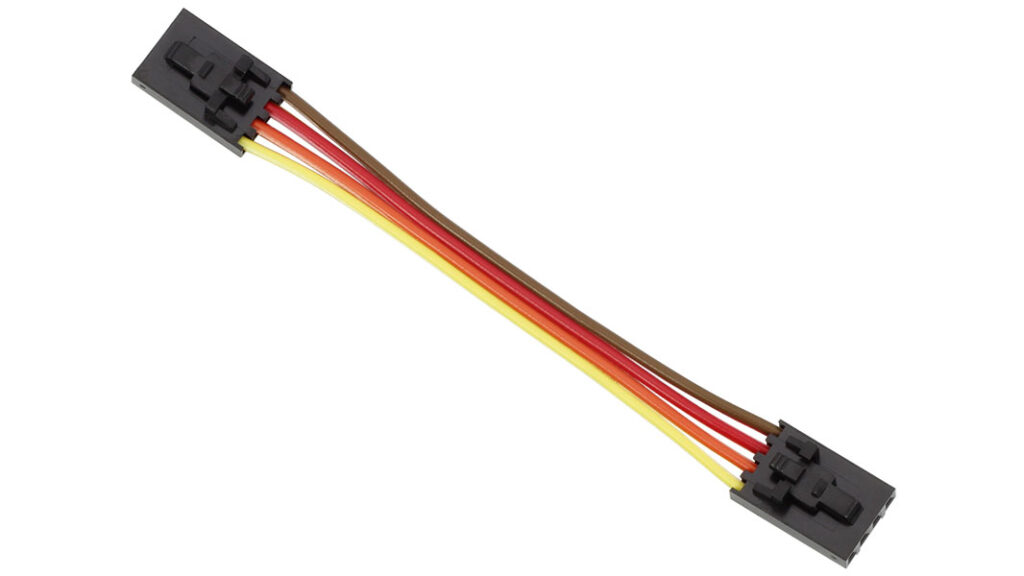
The C-Link or I2C (Inter-Integrated Circuit) connector is a specialized interface found on some advanced power supply units (PSUs), particularly those from Corsair. This connector allows digital communication between the PSU and the motherboard or specialized software, enabling enhanced monitoring and control features.
- Purpose: The primary function of the C-Link or I2C connector is to enable digital communication for real-time monitoring and control of the PSU. This allows users to directly track various metrics, like power usage, efficiency, and temperature, from software.
- Voltage: Unlike traditional power connectors, the C-Link or I2C is not designed to deliver power but to facilitate data communication.
- Design: Depending on the manufacturer, the connector is usually small and may resemble a micro-USB or proprietary interface. It connects the PSU to a corresponding header on the motherboard or a specialized control unit.
- Compatibility: This feature is generally found on high-end or specialized PSUs and may require a compatible motherboard or software to utilize fully.
Ensure the cables are long enough to reach your components, especially in larger cases, or if you plan to route cables behind the motherboard tray for better cable management.
Understanding the types of PSU connectors and cables that come with a PSU is essential for a successful PC build. Always double-check to ensure that the PSU you’re considering has all the connectors you’ll need for your components. This will save you from last-minute trips to the store for adapters or even returning a PSU that doesn’t meet your needs.
6. Modular vs. Non-Modular vs. Semi-Modular Power Supply Unit
When choosing a Power Supply Unit (PSU) for your computer, one of the key decisions you’ll need to make is whether to go for a modular, semi-modular, or non-modular unit. Each type has its own advantages and disadvantages, and the best choice depends on your specific needs, budget, and how you prioritize factors like cable management, airflow, and aesthetics. Here’s a breakdown of what each type offers:
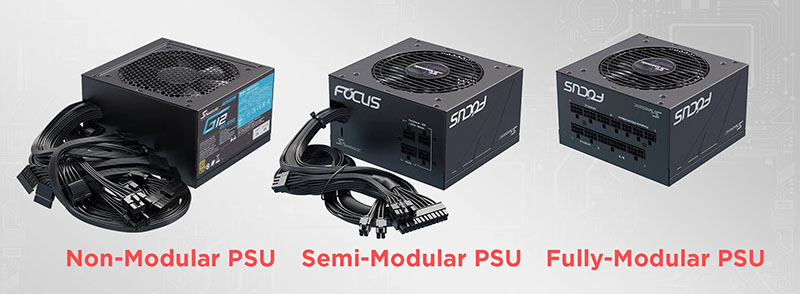
Modular Power Supply Units
Following are some of the major advantages and disadvantages of modular power supply units:
Modular PSUs Advantages:
- Cable Management: Modular PSUs allow you to use only the cables you need, making it easier to manage cables and keep the inside of your PC clean.
- Improved Airflow: Fewer cables mean less obstruction, which can improve airflow and, consequently, cooling within the case.
- Aesthetics: A cleaner build is generally more visually appealing, especially if you have a case with a window.
- Ease of Installation: You can connect cables one by one, making it easier to route them exactly where you want.
Modular PSUs Disadvantages:
- Cost: Modular PSUs are generally more expensive than their non-modular counterparts.
- Potential for Lost Cables: Since cables can be detached, they can also be misplaced, which could be problematic for future upgrades.
Non-Modular Power Supply Units
Following are some of the major advantages and disadvantages of non-modular power supply units:
Non-Modular PSU Advantages:
- Cost-Effective: Non-modular PSUs are usually cheaper than modular and semi-modular units.
- Simplicity: With all cables permanently attached, you don’t have to worry about choosing the right cables or losing them.
Non-Modular PSU Disadvantages:
- Clutter: All cables are permanently attached, whether you need them or not, which can lead to a cluttered case.
- Reduced Airflow: Excess cables can obstruct airflow, potentially leading to higher temperatures inside the case.
- Installation: A bundle of permanently attached cables can be cumbersome to manage during installation, especially in smaller cases.
Semi-Modular Power Supply Units
Following are some of the major advantages and disadvantages of semi-modular power supply units:
Semi-Modular PSU Advantages:
- Balanced Approach: Semi-modular PSUs offer a middle ground, with essential cables like the 24-pin ATX and 8-pin EPS cables being fixed while additional cables are removable.
- Cost: Generally cheaper than fully modular PSUs but slightly more expensive than non-modular units.
Semi-Modular PSU Disadvantages:
- Partial Clutter: While better than non-modular PSUs, semi-modular units can still lead to some cable clutter.
Modular vs. Non-modular vs. Semi-modular PSUs
- Modular PSUs are best for those who prioritize cable management, aesthetics, and airflow and are willing to pay a premium for these features.
- Non-modular PSUs are suitable for budget builds or situations where cable management and aesthetics are not a priority.
- Semi-Modular PSUs offer a balanced approach, providing some of the benefits of both modular and non-modular designs.
By understanding the pros and cons of each type, you can make an informed decision that best suits your needs and preferences.
7. Noise Levels and Cooling
When selecting a power supply unit (PSU) for your computer, the noise level and cooling efficiency are often overlooked. Both of these factors can significantly impact your overall computing experience, especially if you’re aiming for a quiet and cool system. Here’s what you need to know:
Noise Levels
- Fan Type: The type of fan used in the PSU can significantly affect its noise levels. Some high-quality PSUs use fluid dynamic bearing (FDB) or rifle bearing fans, generally quieter than standard sleeve bearing fans.
- Fan Curve: Some advanced PSUs allow you to customize the fan curve via software, enabling you to set the fan speed based on load or temperature, thus controlling the noise level.
- Fanless/Semi-Fanless Mode: Some PSUs offer a fanless or semi-fanless mode where the fan only spins under heavy load, providing a quieter operation during low to medium usage.
- Acoustic Rating: Some manufacturers provide an acoustic rating in decibels (dB) for their PSUs, giving you an idea of how noisy the unit will be under operation.
Cooling Efficiency
- Heat Sinks: Quality PSUs often come with well-designed heat sinks that efficiently dissipate heat, reducing the need for the fan to spin up frequently.
- Ventilation: The layout and size of the ventilation holes or grills can also impact cooling efficiency. More and larger holes generally mean better airflow and cooling.
- Ambient Temperature: The cooling efficiency of a PSU can also be affected by the ambient temperature of the room where the computer is located. A cooler environment will generally result in a quieter PSU.
- Efficiency Rating: PSUs with higher efficiency ratings (like 80 PLUS Gold, Platinum, or Titanium) often generate less heat, requiring less cooling and thus producing less noise.
Considerations
- System Load: Higher system loads will generally require more power and increase fan speeds, increasing noise levels. Make sure to choose a PSU with a higher wattage than your system needs to keep the fan speed—and noise—down.
- Quality: Higher-quality PSUs generally offer better cooling and lower noise levels, so it may be worth investing in a reputable brand with good reviews in these areas.
Understanding noise levels and cooling efficiency can help you make a more informed decision when choosing a PSU, ensuring a quieter and more thermally efficient system. Always check reviews and specifications to gauge how a particular PSU performs in these aspects.
8. Brand and Warranty
When selecting a Power Supply Unit (PSU) for your computer, the brand and warranty are two critical factors that can significantly influence your decision. Here’s why they are important:
Importance of Brand:
- Quality Assurance: Established brands often have rigorous quality control processes, ensuring that the PSU meets specific standards for performance, durability, and safety.
- Reputation: Brands with a good reputation are more likely to produce reliable and efficient PSUs. User reviews and expert opinions can provide valuable insights into a brand’s credibility.
- Customer Support: Reputable brands usually offer better customer service, including troubleshooting and RMA (Return Merchandise Authorization) processes, making it easier to resolve issues.
- Innovation: Leading brands often invest in research and development, resulting in PSUs with advanced features like modular cables, fanless designs, or digital monitoring capabilities.
Importance of Warranty:
- Longevity: A more extended warranty period indicates the manufacturer’s confidence in the product’s durability. Finding high-quality PSUs with warranties ranging from 5 to 10 years is not uncommon.
- Peace of Mind: A robust warranty provides a safety net in case of failures, defects, or other issues, saving you the cost and hassle of purchasing a new unit.
- Warranty Terms: Read the fine print to understand the warranty. Some warranties may include free shipping for repairs or replacements, while others might not.
- Transferability: Some brands offer transferable warranties, which can be a selling point if you plan to resell the PSU at a later date.
Choosing a PSU from a reputable brand with a strong warranty can provide performance and peace of mind. It’s an important consideration that should be considered when building or upgrading your computer system.
9. Price and Budget
When selecting a Power Supply Unit (PSU) for your computer, the price and budget are crucial factors that can significantly influence your choice. While it’s tempting to opt for the cheapest option available, it’s essential to understand the long-term implications of your decision. Here’s how to strike the right balance between price and budget:
Why Budget Matters:
- System Requirements: Your budget should align with the needs of your system. High-performance gaming rigs or workstations will require a more robust and, consequently, more expensive PSU.
- Future Upgrades: If you plan to upgrade your system, invest in a higher-wattage PSU now, saving you the cost of another upgrade later.
- Quality Over Quantity: A cheaper PSU might offer higher wattage, but it could compromise quality, efficiency, and reliability. It’s often better to go for a slightly less robust but more reliable unit.
Price Considerations:
- Efficiency Ratings: PSUs with higher efficiency ratings like 80 PLUS Gold or Platinum are generally more expensive but can save you money in the long run through lower electricity bills.
- Warranty: Units with extended warranties may cost more but offer peace of mind and long-term reliability.
- Modularity: Modular PSUs, which allow you to remove unused cables, are generally more expensive than non-modular ones but offer better cable management and airflow.
- Brand Reputation: Established brands may charge a premium for their PSUs, but you often pay for better quality, customer service, and warranty terms.
By carefully considering your budget and the price of potential PSUs, you can make an informed decision that balances both immediate costs and long-term value. Remember, a good PSU is an investment in the stability and longevity of your entire system.
Conclusion
Choosing a PSU is a nuanced task that requires careful consideration of various factors. By following this guide, you’ll be well-equipped to make an informed decision that will serve you well for years to come.
Choosing the correct power supply is crucial in assembling a new computer. Taking a few extra moments to ensure that your PSU delivers stable, dependable, and secure power to your system components can save you significant time down the line. Plus, it contributes to making your PC more efficient and reliable.
You Might Also Read:


